We are living in an era of technology. Nowadays, we need gadgets to perform our day to day activities. But during the time of the pandemic, these gadgets helped us to complete self-isolation and quarantine periods. Also, there is no doubt that these gadgets proved their worth in the lockdown period when everyone was instructed to work from home. But, on the laptops, there is a common issue, in which the webcam doesn’t work correctly. During the COVID-19 period, many Lenovo users reported problems with their webcam, as nobody was able to get help from support staff owing to the lockdown. Of course, this Lenovo webcam not working error can be very frustrating for everyone.
Although this Lenovo webcam not working error isn’t just limited to Lenovo laptops. Anyone can be a victim of this problem. However, this Lenovo webcam not working issue isn’t very hard to solve. To solve it, neither you need any hardware/ software and coding knowledge. You can just fix it after a few clicks of your mouse or trackpad.
What is the Cause of Lenovo Webcam Not Working Error?
Lenovo owners face this issue due to some safety features, which disables the web camera of laptops to secure the critical data of users by putting it behind a protective security layer.
Quick Tip: Whenever you get webcam not working notification on your screen, we suggest you must check it whether it is a hardware problem or a software glitch. To check the issue, try accessing Skype, Line, Facebook messenger, etc. If you face the same error with these apps, then there may be several reasons behind this error.
Lenovo Camera Not Working: How to Fix?
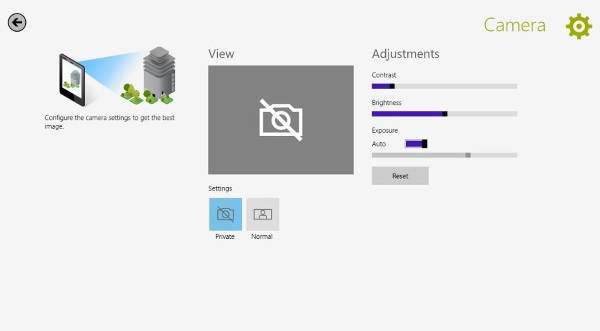
The best solution to fix this camera issue lies within the Lenovo camera app itself. Whenever you notice that your laptop’s camera isn’t working, then you can check it whether it’s turned on or now by pressing the F8 key on your keyboard.
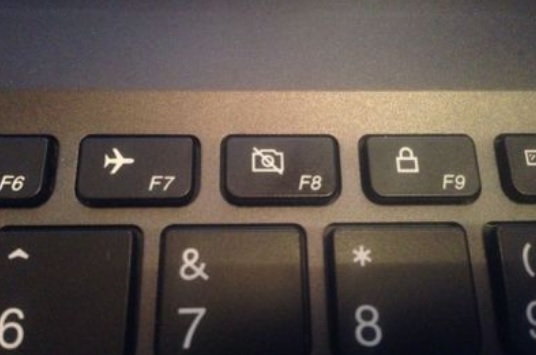
Tip: In Lenovo laptops, F8 is a dedicated key to enable and disable the Lenovo EasyCamera.
If you have already tried this method, but nothing worked. Then don’t worry because you still have some other ways to try.
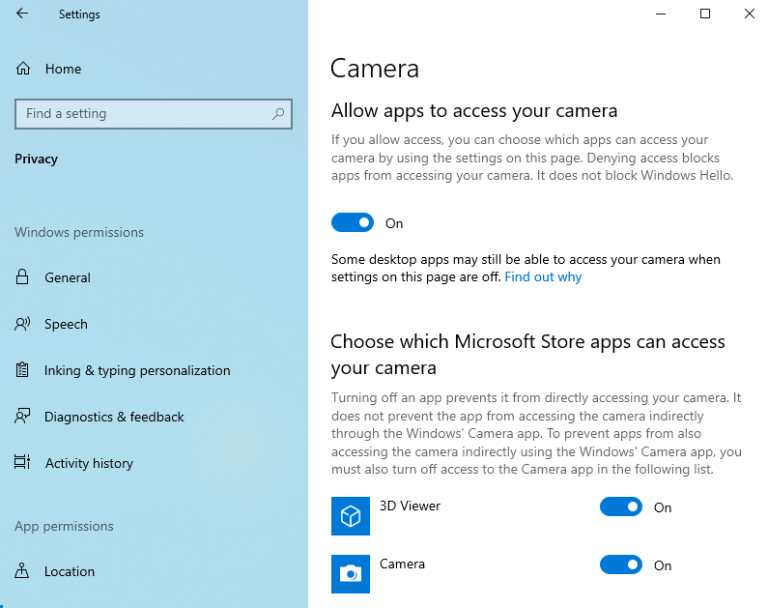
How to Solve the Lenovo Webcam Error Through Camera Settings?
Sometimes it happens that you make changes in your settings without knowing their effects. If you also change some settings in your device then make sure that no major changes were made. To check camera settings, follow these steps.
- Open the windows search box and type “camera” in it.
- Now select the camera setting and open the “camera privacy settings”.
- Toggle Turn Privacy Mode On to Off.
- Now test your laptop’s webcam again.
Tip: The Lenovo added this feature in their laptops as a safety measurement to protect you from the malicious activities and hackers.
If you are still facing the issues with your webcam, then you should try other options to rectify the error. These solutions aren’t just limited to Lenovo laptops; these will also work on all other computers running on the Windows operating system.
Check the Webcam’s Settings in Device Manager
- Hit the right click button on windows start button then select “Device Manager”.
- Select “Imaging Devices” then “Lenovo EasyCamera“. If you can see a yellow triangle sign (that is a warning sign), then it means there is an issue with your camera. But if there is a tiny downward arrow, then the camera disabled and you need to enable it.
- Now right click on the Lenovo EasyCamera, but make sure that there is no option to turn it on. If the camera is already active, then you’ll see the option to deactivate it.
If the webcam is already on, then there may be an issue with your drivers. Under these circumstances, we suggest you must install the latest drivers from the official website. To start the driver updating process, follow the steps mentioned below.
- Right-click the “Lenovo EasyCamera” again and choose “Update Driver”.
- Try to check if Windows can find a fresh driver. To do this, select the automatic option.
- Allow it to install and then recheck your camera.
Somehow, if your machine can’t find the latest version of drivers, then you can download Lenovo EasyCamera drivers directly from the official website.
Even after updating the drivers’ version, if you see face the same problem, then we suggest you perform a complete refresh. That means you should delete all the previously installed drivers and install the latest version of drivers in your laptop. After completing the installation process, reboot your computer, and we are sure that the issue is solved now.
Suggestion: The legacy settings can remain the same even after you overwrite them by installing the latest version of drivers.
Guide to Solve Lenovo Webcam Not Working Error By Check the Program Settings
Suppose you can use the camera of your laptop in other apps, such as Skype, messenger and etc. But it isn’t working with other software or programs. Then there may be an issue with software/program settings, not with the camera settings.
Just follow these two steps to check Settings:
- Open the program in which you are facing issues then find the “Settings” menu option.
- Before performing these steps, always make it sure that the “Lenovo EasyCamera” is selected as the “default” camera in those settings.
If the Lenovo EasyCamera was the default camera in those setting, then it may be the solution to fix this irritating error.
Uninstall the Lenovo Settings App
It only happens in rare cases, but somehow if none of those as mentioned above solutions didn’t work for you, then you can uninstall the Lenovo Settings app altogether to check if it is complications. We suggest you to try uninstalling the preinstalled Lenovo Setting App. Because if nothing else works, then you have nothing to lose.
Don’t worry; you aren’t damaging your computer as most of the settings which are available in the Lenovo application are controllable within the windows itself. So, do not worry about all those settings.
To remove the Lenovo Settings app, follow these four steps:
- Open the “Control Panel” in Windows.
- Select “Programs and Features” then select “Uninstall“.
- Now select “Lenovo Settings Dependency Package” from the list and hit the Uninstall button.
- Reboot your laptop and recheck if the camera is working now or not.
Conclusion
Hopefully, after performing steps as mentioned in this article, your webcam will be working again. But somehow, if your camera is still not working (happen only in worst cases), then we suggest you take it to an expert.